Showing posts with label Beautiful Wings Embosslit. Show all posts

Saturday, July 7, 2012

Simply Ashley


My granddaughter Ashley loves to pose for the camera. I love to take photos. It's a perfect match! I used my Stampin' Up! tools to work with many non-Stampin' Up! items. Love how I can mix and match my tools to my needs!


To make a page that looks like mine, you’ll need the following supplies. Remember, if you need any of these supplies, just click on the name of the item and it will take you directly to my shop.

Supplies:

animal print paper
Basic Black card stock
Top Note die
Beautiful Wings embosslit
sizzlit alpha die set
Big Shot
1" circle punch
3/4" circle punch
Decorative Label Punch
animal print rhinestones - or use Basic Jewels Rhinestones
alpha stickers
glue dots
snail adhesive

The strips:

Basic Black - 2 x 12
Animal print - 1 1/2 x 12
Basic Black -  1/2 x 12

Photos are sized 3x4


Are you getting inspiration from this blog?   One way you can help support it is to order your Stampin’ Up products through me.   Click HERE to place an order and have your order delivered directly to your door step from Stampin’ Up!

Take some time to get your pinky inky.


Tuesday, June 19, 2012

Fold Out Gift Card holder

Happy Tuesday! Still working on getting all the cards & gift cards out that need to be in the hands of those celebrating things this month. Here's one of the things I've been working on.

Card closed - obviously not the kind of card to go into a regular envelope for mailing.

Sitting up - you can see the card holder hiding in the background.


All the way open. See how the butterflies extend up to cover part of the area and draw your eye upward?

Another view

To make a card that looks like mine, you’ll need the following supplies. Remember, if you need any of these supplies, just click on the name of the item and it will take you directly to my shop.


Supplies:
Real Red card stock
Whisper White card stock
scrap Old Olive card stock
Beautiful Wings embosslit
Floral Frames framelits
Apothecary Accents framelits
Create a Cupcake stamp set
Basic Black stamp pad
Bird Punch
Rhinestone brad *retired
white floral wire *local big box craft store
glue dots
hot glue gun
1 /16 hold punch
Sticky tape
Big Shot
Paper Piercer 

Card base is cut 4 1/4 x 11.
Score at 5 1/2 and again at 8 1/4.
Valley fold at 5 1/2
Mountain fold at 8 1/4
ON the mountain fold at 8 1/4, punch 2 small holes
Cut 2 sections of white floral wire to your desired length. Wrap these around a pencil or pen a couple of times and set aside.
After using Whisper White card stock and the Beautiful Wings embosslit to create the number of butterflies that you want, warm up your glue gun. Take 2 of the largest butterflies using hot glue adhere the wire between the butterflies. Do the same for the second wire.
Slide the wires into the holes, adjust the height and angle. Adhere the wires down with a strip Sticky tape. Cover the wires and visible sticky tape with a strip of Real Red card stock using more sticky tape on the back of the cover piece if needed.

Creating the flower:

Using several sizes of framelits from the Fun Flowers framelit set and Whisper White card stock, run through the Big Shot.
Take each flower cut out and round edges using a bone folder, the edge of ruler or even rolling on a pen.
After each flower cut out had been rounded, take the back end of a pen or marker, with the flower cupped in your palm and gently push the center of the flower down into your cupped palm. This helps hold the shape and creates a "well" for the flower pieced to fit into each other. Do this for each flower piece.
Stack the flowers building from largest to smallest.
Pierce the center with the Paper Piercer.
Secure flower with a brad.
Adhere flower using glue dots.
Punch 4 bird wings using Old Olive card stock and Bird punch.
Adhere wings like leaves around base of flower.

Adhere several small butterflies up the right hand edge of of the card using glue dots.

Creating the gift card pocket:


Cut a piece of  Real Red card stock  4 1/2 x 3.
Score at 1/4 along 3 sides.
Crease the score lines and remove the "square" that is created at the corners.
Notch the corners of the "flaps" where the "square" has been removed. This allows for the piece to fold easier and lay flatter.
Along the one long side that IS NOT SCORED, use the 1" circle punch centered along the edge, but only about 1/2 way in, punch a half circle for a space to reach in for the gift card.
With Tombo glue, glue down the "flaps" inside the card up a bit from the mountain fold, being sure to keep the piece centered.

Stamp verse from Create a Cupcake using Basic Black ink on Whisper White card stock.
Center Apothecary Accents label framelit over sentiment, run through Big Shot.
Adhere label with verse to gift card holder.


Insert your gift card and present to the recipient.

Take some time to make something special today.

Saturday, June 9, 2012

Butterfly Week - Saturday Scrapbooking

Wow the week sure did fly. I've had a great time coming up with projects for butterfly week. Now it's time for a scrapbook page.


This photo was taken at my daughter's wedding almost 2 years ago. From left to right - Diana's Godmother, Diana's Aunt (my sister) and me. My sister & I have been friends with Cari for almost as long as I can remember. It was an amazing night and being able to share it with such special people made it magical.


To make a page that looks like mine, you’ll need the following supplies. Remember, if you need any of these supplies, just click on the name of the item and it will take you directly to my shop.

Supplies:


Using the Very Vintage jumbo wheel, handle and Basic Black ink cartridge, create the background on Whisper White. 
Cut mats: Basic Black 5 1/2 x 7 1/2
                Riding Hood Red 5 1/4 x 7 1/4
                (photo is 5 x 7)
Adhere photo to mats, adhere to center of page
Using the Beautiful Butterflies die, run a sheet of Basic Black and Riding Hood Red to cut butterflies.
Emboss the large Basic Black butterfly using the Fancy Fan embossing folder in the Big Shot.
Emboss the smaller Riding Hood Red butterfly using the Polka-Dots embossing folder in the Big Shot.
Adhere the Riding Hood Red butterfly to the Basic Black butterfly using a dimensional.
Adhere this large butterfly to the upper left hand corner of the photo area.
Use scraps of Basic Black card stock in the Beautiful Wings embosslit. You will need 2 sets of these butterflies.
Adhere 3 small butterflies in a grouping that looks good to you using glue dots.
Cut Riding Hood Red Apothecary Label to be used for journaling block.
Ink edges of label in Basic Black Ink.
Write journaling.
Adhere label to page.
Attach butterflies on either side of journaling label.
Using Basic Jewels Rhinestones, adhere small strip to the "body" of the large butterfly near the photo.
Put smaller rhinestone in the center of the rest of the butterflies.
Put small rhinestones in the center of some of the flowers in the background stamped image for added sparkle.

Let your creativity sparkle - make some thing today.


Friday, June 8, 2012

Butterfly Week - Fast Card Friday


Ever look at cards online and think: WOW I really want to try to make that? I've been doing a lot of that lately. I've really enjoyed the process of taking that original idea and turning into something my own. Today's card came about that way. 

I saw a card online and thought I'd like to try to make it. So I grab some paper that was similar in color and gave it a shot.


I liked that one so much I through I'd try it in other colors. (Sorry for the rotten photos - it was reallllllllly late at night when I took them.)

 Tempting Turquoise

Elegant Eggplant

Wisteria Wonder

To make a card that looks like mine, you’ll need the following supplies. Remember, if you need any of these supplies, just click on the name of the item and it will take you directly to my shop.

Supplies:


Card base is standard size.
Basic Black card stock mat is 4 x 5 1/4
Colored card stock mat is 3 3/4 x 5

Let your creativity shine ~ make something today!


Thursday, June 7, 2012

Butterfly Week - Thursday


Today's card is a pretty quick but has a little sparkle to give it a punch. 


To make a card that looks like mine, you’ll need the following supplies. Remember, if you need any of these supplies, just click on the name of the item and it will take you directly to my shop.


Supplies:

Corner Rounder *I used a larger corner rounder
narrow white ribbon

  • Card base is 4 1/3 x 5 1/2, cutting an 8 1/2 x 11 sheet of paper portrait style. This makes the card sit like a tent.
  • Cut a piece of Whisper White card stock 4 x 5 1/4.
  • Round corners of Whisper  White card stock and the bottom corners of the card base.
  • Insert the Whisper White piece into the embossing folder, 3/4 of the way in. 
  • Run through Big Shot.
  • Take a small piece of Rich Razzelberry, insert in the Beautiful Wings embosslit, and run through the Big Shot.
  • Cut narrow ribbon to go across the card where the dots stop. Adhere to card. 
  • Create a fauz bow and adhere.
  • Adhere Whisper White piece to card base.
  • Adhere butterflies to bottom of card using glue dots.
  • Using Dazzling Details, emphasis the detail on the butterflies. 
Have fun creating your own cards today.

Wednesday, June 6, 2012

Butterfly Week - Wednesday


Here we are at Wednesday already in our Butterfly Week. Today's card uses the left over butterflies from other projects that I talked about yesterday.


To make a card that looks like mine, you’ll need the following supplies. Remember, if you need any of these supplies, just click on the name of the item and it will take you directly to my shop.

Supplies:

  • Card base is 4 x 5 1/2.
  • Using the Big Shot, run a 3 1/4 x 3 1/4 piece of Whisper White card stock through in the Lattice embossing folder. 
  • Arrange the butterflies as desired and adhere with glue dots. 
  • Cut pieces of Baker's Twine to create grid and adhere to the back of the square. 
  • Adhere square to card base with dimensionals. 
  • Trim a piece of Whisper White card stock to 1 1/4 x 3 and cut a notch in the end to create a banner. 
  • Stamp sentiment in Tempting Turquoise ink. 
  • Adhere more butterflies. 
  • Attach banner to top of card.

If you have any questions, leave me a comment.

Take some time and create something today.


Tuesday, June 5, 2012

Butterfly Week - Tuesday


Today's card  is adapted from a card that my Upline created, Dawn Griffin. This card is a 5" square card. Remember that you'll need a larger size envelope to mail these and you may need to add a bit extra in postage because it's not a traditional size.


To make this card like mine, you'll need the following supplies. Remember, if you need any of these supplies, just click on the name of the item and it will take you directly to my shop.


Supplies:
Basic Black card stockTempting Turquoise card stock
Beautiful Wings embosslit
Scallop Trim border punch
Basic Jewels Pearls
White gel pen
Dimensionals
Snail adhesive
Glue dots

Card base is 5" square, so card stock needs to be cut 5" x 10".
Mats:
Basic Black - 4 3/4" square
Tempting Turquoise - 4 1/2" square
Basic Black strip - 1 1/2" x 4 1/2"

Using the Scalloped trim border punch, punch along the bottom of the Basic Black Strip.
Take the gel pen and make little dots on the strip. I've found that it's better to do this now than to wait until after you place the butterflies.
Use the Beautiful Wings embosslit to create butterflies.
Put dots on the butterflies that have the raised dots.
Place the dot butterflies on top of the largest butterfly with glue dots.
Arrange the large butterflies along the Basic Black strip and attach using dimensionals. I popped the center butterfly up on 2 dimensionals for a little something different.
Arrange 3 of the same smaller butterflies in the upper right hand corner and attach with glue dots.
Add pearls to butterflies.
*If desired, stamp a sentiment in the upper left hand  corner.

Tip Tuesday: 

My tip for you this week is ... when using the Beautiful Wings embosslit, the butterflies that you don't use in a particular project - save them. Grab a baggie or an envelope, whatever works for you and save them. Use these extra butterflies to create in other projects, like what I'll be showing you on Wednesday. By saving these little bits & pieces you'll be stretching your crafting dollar and maximizing your crafting time.  

Now it's your turn. Take some time to be creative today.


Butterfly Week - Monday

Welcome to Butterfly Week!
This week I'll be showing you all kinds of cards and projects that feature butterflies as the focusing accent. So grab your butterfly punches, dies and embosslits and let's get started.


This card is a CASE (copy and share everything) from a card I saw on Pinterest. I don't remember who the original designer is, so if you know, please leave me a message and I'll make sure to give proper credit.

To make this card like mine, you need the following supplies. Remember, if you need any of these supplies, just click on the name of the item and it will take you directly to my shop.

Today's card is a bit bigger than usual. The card base is 4 1/2 x 5 3/4, so you'll need a bigger envelope.

Supplies:

Sizes to cut squares:
Whisper White: 1 1/4 inch
Basic Black: 1 1/2 inch
Pacific Point: 1 3/4 inch

Rectangle strip:
Whisper White:  2 x 4 1/2
Basic Black:  2 3/16 x 4 5/8
Pacific Point: 2 5/16 x 4 3/16


To make your card like mine, assemble the pieces according to the photo. 
Take some time today to get out your supplies and get creative.


Thursday, May 24, 2012

More Color Resist

Here's another card I made using the Color Resist Technique. I'm loving this technique right now. There's something therapeutic about rubbing ink on a card and watching the color change in just the right spots. I talked about this technique in this post. 


This is longer card than an A2 card and it isn't too tall. It would fit inside a check size envelope.

To make my card you need the following supplies. Remember, if you need any of these supplies, just click on the name of the item and it will take you directly to my shop.


Supplies:
Tempting Turquoise card stock
Basic Black card stock
Whisper White card stock
Basic Gray ink
Versamark ink
Tempting Turquoise ink
Upsy Daisy stamp set * retiring 5/31/12
En Francais stamp
clear embossing powder
Heat gun
Beautiful Wings embosslit
Big Shot
Sponge Dauber
Glue Dots
Snail Adhesive

Adhere the Basic Black card stock to Tempting Turquoise card base.
Stamp Daisies from set with Versamark ink. Cover with clear embossing powder and heat.
When embossing has cooled, ink En Francais stamp with Basic Gray ink. Stamp once lightly on scratch paper then on to Whisper White layer.
When ink is dry, remove ink from daisies with a paper towel in a rubbing motion.
Ink edges of stamped layer with Tempting Turquoise ink apply more to the edges and using a lighter touch in the center. Remove extra ink from the daisy with paper towel.
Run Basic Black paper in Beautiful Wing embosslit through the Big Shot.
Adhere the stamped layer to the Basic Black layer.
Adhere the butterflies using glue dots.


If you haven't tried this technique before I highly recommend it. Get out your supplies and have some fun creating something today. Please leave me a comment if you'd like me to create a video on how do the Color Resist Technique.


Friday, May 11, 2012

Fast Card Friday

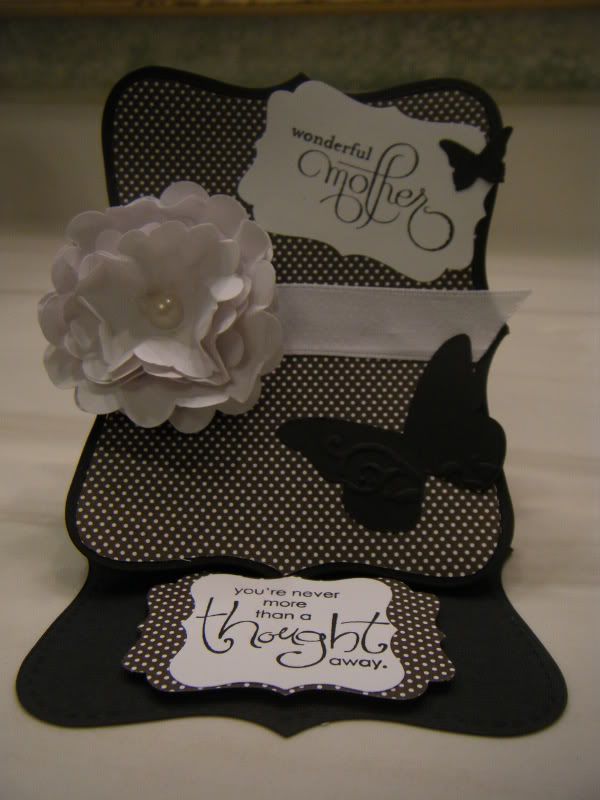
Mother's Day Card

Mother's Day is this weekend. I hope you'll be spending it will people you love. Here's a little something that I whipped up. The longest part of making this card is making the flower. You could speed that up by using Paper Daisy Accents flowers from Stampin' Up!


Supplies:
White Ribbon
sentiment stamps
adhesives


This is a basic easel card in a Top Note Die shape. When you run the base of the card through the Big Shot using the Top Note Die you will need to:
  • Cut black paper 5 1/2 x 11
  • Fold @ 5 1/2
  • Place fold slightly below the top cutting edge of the die so that the fold will stay intact after cutting.
  • Cut another piece of black with the top note die - this is the front
  • Cut a piece of Berry Blossoms Designer Paper with the Top Note Die
  • Trim the designer paper around the edge, cutting along the "stitched" edge of the paper
  • From this point on build your card.


Take a moment to get out your supplies and make something special today. 


Saturday, May 5, 2012

Scrapbooking with Wisteria Wonder

This is the last post for Wisteria Wonder Week. Hope you had fun with it. Now ....

Just a few quick pages using


The layouts are pretty straight forward. The mats are cut to hold 4 x 6 photos in landscape. The base butterfly is only only attached on the right side while the butterflies on top are attached completely. A small pearl is placed on top.


 Here it is with actual photos on it!


Both of these papers are from the Berry Blossoms Designer Series Paper. It is retiring, along with all of our Designer Series Paper.Visit my store to order yours before they're gone for good.

This is my niece on her wedding day with her dashing hubby. Aren't they cute. 
The photos is 5 x 7. Matting is 1/4 larger on all sides. 
The little journaling spot is the Modern Label with the top trimmed and inked with Wisteria Wonder.


Be sure to check back next Saturday for more Scrapbooking ideas.


Thursday, May 3, 2012

Wisteria Wonder Box

Wisteria Wonder Week continues.

One day I was surfing Pinterest and I ran across a very cool project to make a box. The box looked useful, as most boxes do. It looked fast to put together - always a good thing. So I gave it a shot and this is what I came up with.


The base of the box is Wisteria Wonder. 

Tools Needed:
Velcro


With long edge of paper against the top of the Simply Scored, score @ 4 3/4 and 6 1/4.
With short edge of paper against the top of the Simply Scored, score @ 1 1/4 and 7 1/4.
Where indicated in red on the guide below, cut score lines up to, but NOT THROUGH  the intersecting point to create a flap on each side.
Follow directions on guide below for fold directions and where to attach sticky strip. (If you need to see a larger version, just click on the photo.)


Cut up to the intersecting score line, but NOT THROUGH it. This creates your flaps.

See the flaps now. Then put sticky strip on the long flaps on the left.

I put a touch of snail on the short flaps to hold the long flaps on the right side in place while I work.
Then remove the red covering from the sticky strip. Adhere those flaps over the sides you created above.

Now you have a box to decorate!

Box Top

Take a piece of card stock measuring 5 1/2 x 6. With the short side against the Simply Scored, score @ 2 and again @ 3 1/2.
Crease the score lines.
Put sticky strip on the flap that you want to attach to the back of the box top. 
Remove the red covering and adhere to the back of the box being sure to line up the edge of the top with the edge of the box.
Decorate the front flap if you wish. Put a small Velcro tab under the front flap and to the front of the box to keep box closed.  


If you want to create a box like my Wisteria Wonder Box, here are the sized to cut the mats.

Box Front:
Whisper White: 5 3/4 X 4 1/4
Wisteria Wonder designer paper: 5 1/4 X 4

Box Top:
Whisper White: 1 3/4 X 5 3/4
Wisteria Wonder designer paper: 1 1/4 X 5 1/4


If you need supplies to create your own box, stop by my shop: http://www.stampinup.net/esuite/home/janice_inkypinky/
Have fun creating your own box.


Wednesday, May 2, 2012

Upsy Daisy in Wisteria Wonder

I was sooooooooooo sad to learn that the Upsy Daisy set would retire at the end of this catalog, May 31st. I had just gotten the set when the retirement list was released. So I've decided to showcase stamps that will be retiring. If you're want to check to see if that stamp set on your "wish list" will still be around June 1st, click on the "Retired" icon on the right to visit the list and my store.

Here's today's card:


  • Adhere to card base.


  • Stamp the sentiment from the Upsy Daisy set on a scrap of Whisper White.


  • Cut the Wisteria Wonder label down across the width of the label  from end to end (<------>).


  • Adhere the Wisteria Wonder label to the Whisper White label so that the edges of the Wisteria Wonder label show a bit. 


  • Attach to card.


  • Use one of the butterflies to accent the flowers, adhering with glue.


Have fun with your supplies today and make something!


Wednesday, April 25, 2012

Happy Wednesday!

In keeping with the Birthday Theme that seems to be running through my mind right now - here's a Cupcake Throne that I made for my friend Kat's birthday.


Beautiful Wings Embosslit - a must have for your crafting!
Scallop Oval Punch - don't know what I did before I owned this punch - use it a lot!


It's a mix of Stampin' Up! papers and non-Stampin' Up! papers. ;) (need to use some stuff up around the old Inky Pinky Studio). I had a butterfly theme going for Kat's card (like THIS card only it says Happy Birthday) and carried over to her Cupcake Throne. I'll be teaching this at my Birthday Bash class in June.

Dates for May and June classes will be up later this week. If you can't make the classes, kits with photos & PDF directions will be available. Watch for more info on this soon.

Don't forget Stampin' Up! is clearing out stamps to make way for all the wonderful & exciting changes coming June 1st. Check out the Retiring Products HERE.

Have a great day and get out your supplies and make something!