Showing posts with label Tip Tuesday. Show all posts

Tuesday, July 10, 2012

Technique Tuesday - creating a sponging stencil


I needed a couple of Sympathy cards last week. These are the hardest cards for me to make. I can come up with stuff for men easier than ideas for sympathy cards. I'm never sure if the image conveys my feelings. I finally figured out that simple is better. I go with simple clean images and a simple message. This card says "With Sympathy" inside. That's it. It works.


To make a card that looks like mine, you’ll need the following supplies. Remember, if you need any of these supplies, just click on the name of the item and it will take you directly to my shop.

Supplies:

white ribbon
your choice of sentiments for the inside of the card

Directions:

  • Wisteria Wonder card base is standard size.
  • Whisper White mat is cat at 4 x 5 1/4.
  • Round corners of Whisper White card stock.
  • Select image from Bordering on Romance stamp set.
  • Stamp in center of Whisper White card stock using Stazon ink.
  • Using the Big Shot and the Apothecary labels framelits, choose the one that matched the image above. Cut the label using scrap paper. 
  •  Use NEGATIVE part of the label cut out to create a stencil. Center the "stencil" on Whisper White card stock over the stamped image. Using a sponge dauber and Wisteria Wonder ink to sponge inside the stencil but NOT on top of the image.
  • Be sure the sponged ink is dry before moving on.
  • Color image.
  • Add pearls to the inside of the 3 largest flowers.
  • Adhere the mat to the card base
  • Tie ribbon around card


Are you getting inspiration from this blog?   One way you can help support it is to order your Stampin’ Up products through me.   Click HERE to place an order and have your order delivered directly to your door step from Stampin’ Up! 

Take some time to get your pinky inky today!


Tuesday, June 5, 2012

Butterfly Week - Tuesday


Today's card  is adapted from a card that my Upline created, Dawn Griffin. This card is a 5" square card. Remember that you'll need a larger size envelope to mail these and you may need to add a bit extra in postage because it's not a traditional size.


To make this card like mine, you'll need the following supplies. Remember, if you need any of these supplies, just click on the name of the item and it will take you directly to my shop.


Supplies:
Basic Black card stockTempting Turquoise card stock
Beautiful Wings embosslit
Scallop Trim border punch
Basic Jewels Pearls
White gel pen
Dimensionals
Snail adhesive
Glue dots

Card base is 5" square, so card stock needs to be cut 5" x 10".
Mats:
Basic Black - 4 3/4" square
Tempting Turquoise - 4 1/2" square
Basic Black strip - 1 1/2" x 4 1/2"

Using the Scalloped trim border punch, punch along the bottom of the Basic Black Strip.
Take the gel pen and make little dots on the strip. I've found that it's better to do this now than to wait until after you place the butterflies.
Use the Beautiful Wings embosslit to create butterflies.
Put dots on the butterflies that have the raised dots.
Place the dot butterflies on top of the largest butterfly with glue dots.
Arrange the large butterflies along the Basic Black strip and attach using dimensionals. I popped the center butterfly up on 2 dimensionals for a little something different.
Arrange 3 of the same smaller butterflies in the upper right hand corner and attach with glue dots.
Add pearls to butterflies.
*If desired, stamp a sentiment in the upper left hand  corner.

Tip Tuesday: 

My tip for you this week is ... when using the Beautiful Wings embosslit, the butterflies that you don't use in a particular project - save them. Grab a baggie or an envelope, whatever works for you and save them. Use these extra butterflies to create in other projects, like what I'll be showing you on Wednesday. By saving these little bits & pieces you'll be stretching your crafting dollar and maximizing your crafting time.  

Now it's your turn. Take some time to be creative today.


Thursday, May 31, 2012

Playing Catch Up

Hi Everyone! Hope your Memorial Day was great. We've been in and out of town so much this last month and had so many changes with things in the house ... well I just needed some time to clean and organize a bit. Still not done but moving in a positive direction.

So ... I've not posted for a few days. Ya I know ... you missed me. Don't worry, I gotcha covered! Here in one place are the posts for Tuesday and Wednesday. No more chit chat now. On with the important stuff.

Tip Tuesday -
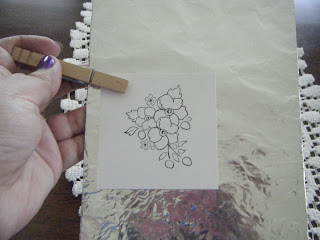
Long ago in a far away land I learned to stamp and then learned to emboss. I learned to emboss over a toaster!  (Told ya it was long ago - didn't have heat guns back then!) Once heat guns were available for stamping instead of stripping paint & wall paper (did you know that's how they started out?) and I got my hands on one I learned a few tricks. Here's one today:


  • Grab a piece of cardboard, any cardboard: old cereal box, the cardboard from a pack of Designer Series Paper or the back of an old notebook. Doesn't matter. 
  • Make sure the piece of cardboard is at least 5" x7" in size.
  • Cover the cardboard with aluminium foil. Make sure the shiniest side is facing out. One side covered completely is all you need.
  • Get a clothes pin.
  • Now you have your own embossing "platform". The foil reflects the heat back on the paper and helps to heat the embossing powder faster. Also helps prevent that nasty buckle that can happen when embossing without a platform. The clothes pin holds the piece waiting to be embossed in place and helps to keep from getting your Inky Pinky too toasty. 
This is mine. Use it all the time.

Wednesday's post -

Now I know that I usually share scrapbooking pages on Saturday but I wanted to get this one sooner. See the background paper was made with a stamp that is being retired and I want you to be able to get it before it's gone. 


Supplies:

  • Stamp in random pattern on Whisper White card stock using Calypso Coral ink and the large splotch from the Extreme Elements stamp set. 
  • Trim a piece of Calypso Coral card stock to fit your photo and randomly stamp the splotch  from the Extreme Elements stamp set  using Calypso Coral ink. 
  • Adhere photo.
  • Using the Big Shot and Lucky Limeade card stock, cut a Top Note Die and trim off a small portion of the top. Adhere the cut edge under the photo.
  • With a scrap of Lucky Limeade card stock, punch a Decorative Label and cut in half.
  • Adhere to the top right corner of Calypso Coral card stock.
  • I stamped the year on top but you could do anything that works with your photo.
  • The Top Note Die is used for your journaling.

Remember, if you need any of these supplies, just click on the name of the item and it will take you directly to my shop. If you have any questions just leave me a comment or send me an email.


BTW, that's my adorable granddaughter. She was showing off her amazing bubble blowing skills. I love 8 year olds!

Enjoy!