I'm making my Monday post on Tuesday. :( I live in Oklahoma and it's hot here ... no not just hot ... really hot ... like melt the rubber of your flip-flops hot. We're the hottest place in the nation today - probably all week. This heat just zaps all your energy ... which is why your Monday post is on Tuesday.
Despite the heat, we had our Birthday Bash class last week. I must say, we had a lovely time creating and visiting. It was a sweet cool spot in the midst of all this heat! Such lovely ladies I have to craft with, they just brighten your day.
We made 3 cards this time. Aren't they just darling? Everyone did a great job and had fun in the process.
Birthday Bash Card Class
Fun cards that were pretty quick. The best part is that the design for 2 of the 3 cards can be used almost any occasion by just changing the sentiment.
Watch for our August class dates. We'll be embarking on a scrapbook class entitled "The Story of Us".
To make a card that looks like
mine, you’ll need the following supplies. Remember, if you need any of these
supplies, just click on the name of the item and it will take you directly to
my shop.
Crumb Cake card base is standard size.
Soft Suede mat is 1 3/4 x 3 3/4
Comfort Care mat is 1 1/2 x 3 5/8
Adhere Comfort Care mat to Soft Suede mat.
Attach mats to card using photo as guide for placement.
Stamp Happy Birthday from Perfectly Penned stamp set on Naturals Ivory card stock using Crumb Cake ink.
Cut out sentiment and mount on mats using dimensionals.
Using thread for your choice, tie thread through holes in button and trim off excess.
Attach button to card using dimensional.
Are you getting inspiration from this
blog? One way you can help support it is to order your Stampin’ Up
products through me. ClickHEREto place
an order and have your order delivered directly to your door step from Stampin’
Up!
Hi All!
As you may have noticed ... if you look at the dates of my posts, I was gone last week. I ended up traveling with my hubby on business. It was a much needed break and I was able to clear my head a bit. There are a few changes coming to the blog also. New posts will be added on Monday, Wednesday and Friday. I'll be able to keep up much better and the hubby will be happier since he'll get actual food cooked for him more regularly!
Today let's talk about scapbooking. I've been a scrapbooking for over 15 years. I've seen all the fads come and go. I've tried my hand at a lot of different styles and techniques over the years too. All-in-all I'd have to say that my personal style is pretty clean and simple. I like a simple elegant look to my pages and want the focus on the photos, not all the extra "stuff" that can be stuck on a page.
When I'm planning pages I first look at my photos. More often than not I plan to tell a story to go with the photos. The story doesn't have to be exactly the who/what/when/where of the photo. Often it's the story behind the photo - why I took it, what it reminds me of, where I was in my life journey when I took the photo - the deeper stuff. I do also note somewhere on the page the who/what/when/where of the photo but it isn't always the main point.
Next I start looking at color. This is my favorite part. I like to pick colors from the photos that work well together and enhance the photo to make it pop off the page. This step is important and should not be over looked. This is a HUGE reason why I love Stampin' Up! products. All the papers go with the inks. Matching colors is so much easier and so much less time consuming.
The next step - placement. I often work from sketches to help with placement. They're nice and easy and make that step move just a bit faster. Most of the time I end up with something that differs from the sketch - but that's ok. I need it to work for my photos not some imagined "scrapbook judge & jury". Stop the negative talk in your head. If you like your page that's all that is important. Don't strive to have your pages look like someone else's - your style and expression are important - make it look like your work. Your style is just as important as anyone else's - that's what is important to your family.
There are ALL kinds of ways to scrapbook and no way is more "correct" than another. This is a very personal hobby. At the risk of repeating myself ... you need to work in a way that is comfortable for YOU!
Digital scrapbooking - there are all kinds of digital layouts. That is a totally different post.
Traditional Scrapbooking - pieces of paper, adhesive and photos. Sizes for traditional scrapbooking vary greatly. I lean toward 12 x 12 pages simply because that works the best for me. It allows me the best space for photos, story telling and some artistic embellishments.
Project Life - Project Life or PL is the brain child of Becky Higgins. You may remember her from Creative Memories magazine and her sketches. She's a busy mom and traditional ways of scrapbooking just weren't working for her any more. So she developed this new way of scapping. It's faster, uniform and really allows for the story to come forth in an easy way. Here's a video by Beck that shows it much better than I could explain. I've found that for me, PL helps keep me focused. I'm better able to tell the story of life at my house now that we're empty-nesters. It also gave me a place for all those bits and pieces that I want to keep but have trouble getting into a Traditional scrapbook page - like
movie tickets and programs from plays or performances that the grandkids are in. Those bits find a home in PL quickly. I know they are safe as part of our family history not stuffed in a box or lost.
I was able to quickly document some serious rainfall, my son's Going Away party & move, along with seeing a movie and had a place to keep the ticket.
Here I had a place to keep the invitation to my 50th birthday party and one of my cards. They're not shoved in a box waiting for me to "get around to it someday". It's safe and out to enjoy - along with photos from that event.
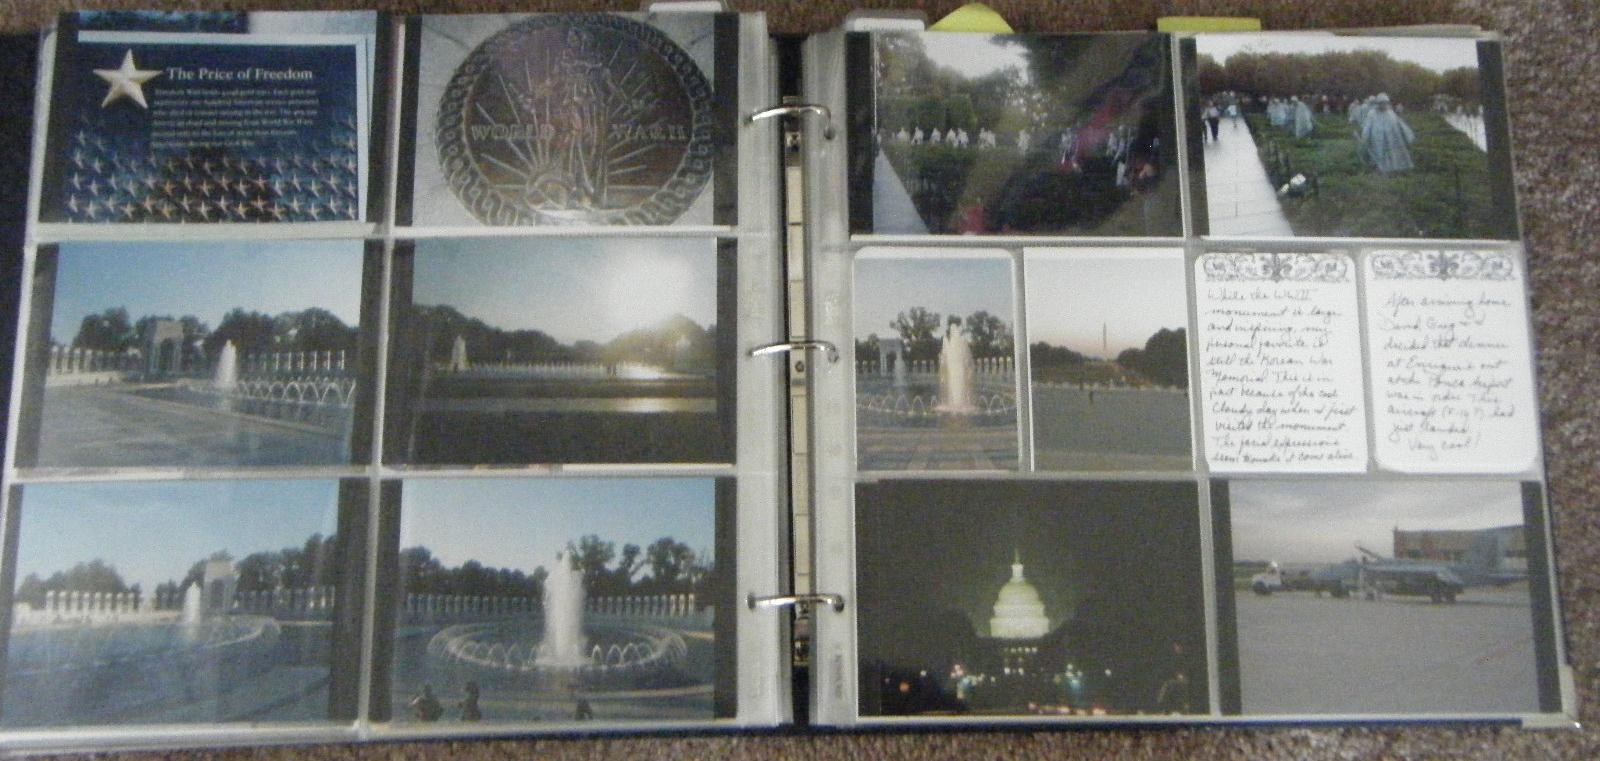
A trip to Washington DC was documented quickly and easily. I added a photo sleeve page for some extra photos. Not hiding in a box or sitting on my hard drive but out to enjoy.
With this system I have a place for things like my cool ticket to a college football game. It wont' get lost now because it is in the book.
I also do traditional 12 x 12 layouts that go in my family albums. I've posted many of those on my blog for you to use as ideas for your work. I use photo pocket pages for extra photos to go with layouts. Honestly, do you realllllllly think that you're going to have enough time, energy, inspiration or money to scrap every single photo? Use the various products out there to get your photos out of those boxes and into a format that can be enjoyed. Be realistic. Do what you enjoy and move on.
Stampin' Up! has page projectors for all of your various scapbooking styles. Whether you work digitally and need to put your printed work in a page protector, a traditional scrapper, if you need pocket style pages for extra photos to go with a layout or if you are doing a variation of Project Life - Stampin' Up! has what you need.
Everyone has had experiences that need to be shared with others. Scrapbooking needn't be time consuming or expensive. Everyone has a story to tell. What's your's?
To make a card that looks like
mine, you’ll need the following supplies. Remember, if you need any of these
supplies, just click on the name of the item and it will take you directly to
my shop.
The card base on this card is tent style - which means the fold is at the top.
Card base measures 4 1/4 x 11 - fold at 5 1/2.
Strip grouping measures 1 1/2.
Attach strips with Snail adhesive.
Strips are from the striped piece of DSP from the Patio Party set. You could use any grouping of strips that works for you.
The heart is hand drawn and cut out of Comfort Card DSP and the mat is from Midnight Muse.
Mount heart & mat with Snail Adhesive.
Stamp sentiment in Midnight Muse ink. Tie ribbon with knot in center.
Attach ribbon with glue dot.
Punch flowers from Boho Blossom and centers of flowers from Owl Punch.
Arrange flowers and attach with Snail.
Round corners of card.
Are you getting inspiration from this
blog? One way you can help support it is to order your Stampin’ Up
products through me. ClickHEREto place
an order and have your order delivered directly to your door step from Stampin’
Up!
I think I mentioned earlier this week that today is my darling daughter's birthday. I thought I'd showcase a few scrapbook pages I've made about her. I hope they bring you some inspiration for you next pages.
The tag to the right contains hidden journaling. I had changed the color of the photo to sepia to work better.
I cut the shape out of the pattern paper and adhered it to the black paper so the page would be more stable and have a bit of heft to it. Yep that's my girl - full of spunk!
A dear friend of the family got
married last Saturday to a darling young lady. We’re so happy for Jeff &
Natasha and wish them a long and happy life together. This is the tiny card I
made to go with their gift. It was super fast but doesn’t look like something
rushed or thrown together.
To make a card that looks like
mine, you’ll need the following supplies. Remember, if you need any of these
supplies, just click on the name of the item and it will take you directly to
my shop.
Whisper White card base is cut
at 6 x 3, scored a 3 to create a 3 x 3 gift card.
Punch all corners using a fancy
corner punch of your choosing.
With the Curly Label punch,
punch the Brushed Silver card stock.
Adhere silver curly label to
center of card.
Stamp sentiment from the Teeny
Tiny Wishes stamp set on to Night of Navy card stock using Whisper White craft
ink.
Once the ink is dry use the
Large Oval punch to punch the Night of Navy card stock, being sure to center
the sentiment within the punch area.
Attach oval to curly label.
Adhere small pearls to the corners
of the curly label punch.
Are you getting inspiration from this
blog? One way you can help support it is to order your Stampin’ Up
products through me. ClickHEREto place
an order and have your order delivered directly to your door step from Stampin’
Up!
The Inky Pinky household is heading into another busy
birthday season. I’m going to need a
bunch of birthday cards. That’s lucky for you since you’ll get to see them all!
LOL
To make a card that looks like
mine, you’ll need the following supplies. Remember, if you need any of these
supplies, just click on the name of the item and it will take you directly to
my shop.
Use the labels that match the
ones in the photo from the Apothecary Accents Label framelits.
Use the smaller label and a
piece of DSP from the Brights Collection, run through the Big Shot.
Use the larger label and a
piece of Old Olive card stock, and run through the Big Shot.
With the Paper Piercing tool
and the Essentials Paper Piercing pack, pierce around the Old Olive piece.
Once all the piercing is done,
use the white gel pen in each piercing to make dots.
Looking at placement in photo,
place and adhere Old Olive piece to the card base. Trim excess edge.
Use piercer to create opening
for brad and place brad in DSP label.
Adhere DSP label to Old Olive
piece with dimensional.
Stamp sentiment using Stazon
Ink and sentiment from Curly Cute.
Trim sentiment piece.
Cut a strip of Tangerine Tango
DSP as a mat for the sentiment piece.
Adhere Tangerine Tango and
sentiment together.
Attach Tangerine Tango piece to
card with dimensional using photo as reference for placement.
Are you getting inspiration from this
blog? One way you can help support it is to order your Stampin’ Up
products through me. ClickHEREto place
an order and have your order delivered directly to your door step from Stampin’
Up!
My baby girl turns 27 this weekend, so when trying to decide
what to scrapbook, naturally she came to mind. These photos were taken when she
was about 3 months old. I just love the look on her face, blowing bubbles and
laughing. Such sweet memories that are now safely stored in my scrapbook.
To make a card that looks like
mine, you’ll need the following supplies. Remember, if you need any of these
supplies, just click on the name of the item and it will take you directly to
my shop.
Mount photos on Real Red matting as a whole strip. Should
measure approx. -----
Night of Navy in lower corner is 3 ½ x 6
Mount Night of Navy matting.
Mount Real Red matting – the lower edge should be just a
bit above the Night of Navy, so that the navy shows
Mat 3x3 photo on Real Red and mount on Night of Navy.
Run largest flower from Floral Frames framelits through the Big Shot using Night of Navy card stock.
Using Old Olive card stock, hand draw stem and cut out. (Tip: trace around the curved edge of a plate for the shape)
Punch out 2 "leaves" from Old Olive with the Large Oval punch, trimming the end by hand for a more leaf like shape.
Stamp lined label image from Everything Eleanor set in Real Red
Punch out lined label with 2 3/8 Scallop Circle punch.
Using 2 1/2 inch circle punch on Real Red card stock, punch circle.
Mount scallop circle on to Real Red circle mat.
Mount Real Red mat on to Night of Navy flower.
Adhere to corner of paper and trim off excess.
Are you getting inspiration from this
blog? One way you can help support it is to order your Stampin’ Up
products through me. ClickHEREto place
an order and have your order delivered directly to your door step from Stampin’
Up!
I needed a couple of Sympathy cards last week. These are the hardest cards for me to make. I can come up with stuff for men easier than ideas for sympathy cards. I'm never sure if the image conveys my feelings. I finally figured out that simple is better. I go with simple clean images and a simple message. This card says "With Sympathy" inside. That's it. It works.
To make a card that looks like
mine, you’ll need the following supplies. Remember, if you need any of these
supplies, just click on the name of the item and it will take you directly to
my shop.
your choice of sentiments for the inside of the card
Directions:
Wisteria Wonder card base is standard size.
Whisper White mat is cat at 4 x 5 1/4.
Round corners of Whisper White card stock.
Select image from Bordering on Romance stamp set.
Stamp in center of Whisper White card stock using Stazon ink.
Using the Big Shot and the Apothecary labels framelits, choose the one that matched the image above. Cut the label using scrap paper.
Use NEGATIVE part of the label cut out to create a stencil. Center the "stencil" on Whisper White card stock over the stamped image. Using a sponge dauber and Wisteria Wonder ink to sponge inside the stencil but NOT on top of the image.
Be sure the sponged ink is dry before moving on.
Color image.
Add pearls to the inside of the 3 largest flowers.
Adhere the mat to the card base
Tie ribbon around card
Are you getting
inspiration from this blog? One way you can help support it is to
order your Stampin’ Up products through me. ClickHEREto place an order and have your order delivered
directly to your door step from Stampin’ Up!
I needed several sympathy cards last week. I wanted something elegant, but not cluttered. Here's what I created.
To make a card that looks like
mine, you’ll need the following supplies. Remember, if you need any of these
supplies, just click on the name of the item and it will take you directly to
my shop.
Ink En Francais stamp in Crumb Cake ink and gently wipe dab off some of the ink so image is light.
Stamp En Francais on to Naturals Ivory mat.
Stamp blossom from Everything Eleanor stamp set in Night of Navy - stamp off on a piece of scrap paper first ... remember we want these images to be light.
Stamp flourish from Everything Eleanor stamp set in Night of Navy - DO NOT stamp off this image. This is one image we want to stand out.
Adhere mat to card base.
Using the Boho Blossom punch, punch out 5 small blossoms from Night of Navy.
Cup each blossom in the palm of your hand, one by one.
Taking a pen with a rounded cap, gently push capped pen in the center of the flower in a round motion. This will make the blossom stand up more and cup the pearl.
Adhere blossoms to the image with glue dots.
Adhere pearls.
stamp sentiment of choice inside
Are you getting inspiration from this
blog? One way you can help support it is to order your Stampin’ Up
products through me. ClickHEREto place
an order and have your order delivered directly to your door step from Stampin’
Up!
My granddaughter Ashley loves to pose for the camera. I love to take photos. It's a perfect match! I used my Stampin' Up! tools to work with many non-Stampin' Up! items. Love how I can mix and match my tools to my needs!
To make a page that looks like mine, you’ll need the following supplies. Remember, if you need any of these supplies, just click on the name of the item and it will take you directly to my shop.
Basic Black - 2 x 12
Animal print - 1 1/2 x 12
Basic Black - 1/2 x 12
Photos are sized 3x4
Are you getting inspiration from this
blog? One way you can help support it is to order your Stampin’ Up
products through me. ClickHEREto place
an order and have your order delivered directly to your door step from Stampin’
Up!
Still thinking about the Founding Fathers. It was a novel idea to include the pursuit of happiness in the Declaration of Independence. Studies have shown that measuring one's own happiness is a uniquely American (North American, for my Canadian friends - you guys do this too). So during this week of celebrating America --- here's a card that speaks to the pursuit of happiness.
Run the Bashful Blue mat through the Big Shot in the Square Lattice embossing folder.
Stamp sentiment on Whisper White using Soft Suede ink.
Using the 3 die from the center of the Labels Collection framelits, cut out the sentiment using the Big Shot, being sure that the sentiment is centered in the framelit.
Ink edges using Soft Suede ink
Adhere sentiment to mat.
Cut a length of Soft Suede Taffeta ribbon, attaching it to the mat.
Cut a smaller length of Soft Suede Taffeta ribbon, tie into a knot and attach to ribbon base using a glue dot.
Attach mat to card base.
*you may wish to secure the ribbon in the front with several glue dots placed along the length of the ribbon since the weight of the knot may move the ribbon*
Are you getting
inspiration from this blog? One way you can help support it is to
order your Stampin’ Up products through me. ClickHEREto place an order and have your order delivered
directly to your door step from Stampin’ Up!
Hope you all had a wonderful 4th of July! We had a wonderful & relaxing time with friends and truly enjoyed our day.
In keeping the the idea of our nation's birthday, I created this card in red, white & blue and used the En Francais background stamp in Midnight Muse. Kinda looks a bit like the style of writing from the Declaration of Independence doesn't it.
To make a card that looks like
mine, you’ll need the following supplies. Remember, if you need any of these
supplies, just click on the name of the item and it will take you directly to
my shop.
This is a pretty straight forward design. Just follow reference the photo for placement if you want yours to look like mine. Here's what I used.
Are you getting inspiration from this blog? One way you can help support it is to order your Stampin’ Up products through me. ClickHEREto place an order and have your order delivered directly to your door step from Stampin’ Up!
Thinking about our Founding Fathers this week. The did a "little bit of good" and sure did overwhelm the world. So here's a simple & clean style card for your busy week ahead.
To make a card that looks like
mine, you’ll need the following supplies. Remember, if you need any of these
supplies, just click on the name of the item and it will take you directly to
my shop.
Whisper White piece is 4 x 5/14, with edge punched with the scallop trim border.
Run the Whisper White piece through the Big Shot in the Perfect Polka Dot embossing folder.
Adhere Whisper White piece to the card base.
Cut a Midnight Muse mat using the 3rd die from the center of the Labels Collection framelits.
Stamp sentiment from Pursuit of Happiness set on Whisper White with Midnight Muse ink.
Using the 2nd die from the center of the Labels Collection framelits, cut out sentiment using the Big Shot, being sure that sentiment is centered in die.
Adhere sentiment to Midnight Muse mat.
Adhere sentiment & mat to card base using dimensionals.
Cutting a small slit in the fold of the card, thread ribbon through slot and under mat (the dimensionals create a space that allows for this)
Tie ribbon in knot on right hand side.
Are you getting
inspiration from this blog? One way you can help support it is to
order your Stampin’ Up products through me. ClickHEREto place an order and have your order delivered
directly to your door step from Stampin’ Up!