Showing posts with label large oval punch. Show all posts

Friday, July 13, 2012

For The Newlyweds - Fast Card Friday


A dear friend of the family got married last Saturday to a darling young lady. We’re so happy for Jeff & Natasha and wish them a long and happy life together. This is the tiny card I made to go with their gift. It was super fast but doesn’t look like something rushed or thrown together.

To make a card that looks like mine, you’ll need the following supplies. Remember, if you need any of these supplies, just click on the name of the item and it will take you directly to my shop.

Supplies:

Fancy corner punch

Directions:

  • Whisper White card base is cut at 6 x 3, scored a 3 to create a 3 x 3 gift card.
  • Punch all corners using a fancy corner punch of your choosing.
  • With the Curly Label punch, punch the Brushed Silver card stock.
  • Adhere silver curly label to center of card.
  • Stamp sentiment from the Teeny Tiny Wishes stamp set on to Night of Navy card stock using Whisper White craft ink.
  • Once the ink is dry use the Large Oval punch to punch the Night of Navy card stock, being sure to center the sentiment within the punch area.
  • Attach oval to curly label.
  • Adhere small pearls to the corners of the curly label punch.

 Are you getting inspiration from this blog?   One way you can help support it is to order your Stampin’ Up products through me.   Click HERE to place an order and have your order delivered directly to your door step from Stampin’ Up!

Take some time to get your pinky inky today.

Friday, June 29, 2012

Fast Card Friday - Summer Starfruit


One of our new "In Colors" is Summer Starfruit. It's an interesting color that works with many darker shades, which would be prefect for those difficult male oriented cards. However, today's card is light and summery and FAST.

Tip: I have a TERRIBLE time getting the notch in my banners centered and even. What I've done is made a template for myself using a piece of light weight cardboard and the Pennant punch. I punched a triangular pennant out and use the tip on my banner, mark the spot (on the back of my paper) and trim by hand. So much faster and much better results!


To make a card that looks like mine, you’ll need the following supplies. Remember, if you need any of these supplies, just click on the name of the item and it will take you directly to my shop.

Supplies:

Patio Party Designer Series paper (the piece with all the different patterns in stripes)
paper trimmer

Directions:

  • Card base is standard size
  • Using a paper trimmer, cut out the strips that are Summer Starfruit colors from the Patio Party DSP piece of paper that is all pattern strips.
  • Using Paper Snip scissors, notch out the banner end on the stripes and cut to desired length.
  • Run a piece of Whisper White card stock (4 x 5 1/4) through the Big Shot in the Fancy Fan embossing folder.
  • Adhere embossed piece to card base.
  • Using a scrap of Whisper White stamp "Live in the sunshine" from the Pursuit of Happiness set using Summer Starfruit ink, punch out with large oval punch.
  • Use the scalloped oval punch to punch out a Summer Starfruit mat.
  • Adhere stamping to mat.
  • To get your banners straight on the top: take a small strip of Whisper White, run a strip of Snail on it. Arrange and adhere banners onto the strip, lining the top edges of  the banners to the top edge of the strip.
  • Adhere banner strip to top left edge of embossed mat.
  • Adhere scalloped oval piece to embossed mat.


Are you getting inspiration from this blog?   One way you can help support it is to order your Stampin’ Up products through me.   Click HERE to place an order and have your order delivered directly to your door step from Stampin’ Up!

Take some time to get your pinky inky today.


Thursday, May 31, 2012

Water color background

Happy Thursday!

Today's card is pretty fast, even if it doesn't look like it is. Get ready to break out the stamp pads and aqua painters.


Supplies:

Basic Black card stock
Whisper White card stock
Calypso Coral stamp pad
Lucky Limeade stamp pad
Wisteria Wonder stamp pad
Island Indigo stamp pad
Upsy Daisy stamp set - retiring 5 /31/12
Scallop oval punch
Large oval punch 
Island Indigo marker
Aqua Painter
Dimensionals


  • Adhere Basic Black card stock to the Wisteria Wonder base.
  • Fill Aqua Painter with water.
  • Smoosh (yes that's a technical term) the tops of the stamp pads to the stamp pad while it's closed. This will put ink on the "lid" and allow you to paint with it.
  • On your Whisper White card stock, paint streaks of color. Be sure to clean the brush of the Aqua Painter between colors.*
  • While waiting for the water colored piece to dry, punch one scalloped oval out of Basic Black.
  • Using the Island Indigo marker color in the "Thank You" portion of the Thank you message stamp in the Upsy Daisy stamp set.
  • Punch Thank You out with the large oval punch.
  • Adhere Thank You to the Basic Black scalloped oval.
  • Once water color background is dry stamp the Upsy Daisy image using Island Indigo over the color streaks.
  • Adhere to card.
  • Adhere scalloped oval to card using dimensionals. 
* To clean Aqua Painter brush between colors just squeeze out water drops until the drops become clear.


Remember, if you need any of these supplies, just click on the name of the item and it will take you directly to my shop.

Reminder

Today is the last day to order from the 2011-2012 catalog. To order from the retired items list click the icon at the top of the list on the right.


Saturday, May 12, 2012

My Talented Niece

Family Scrapbook Page Swap

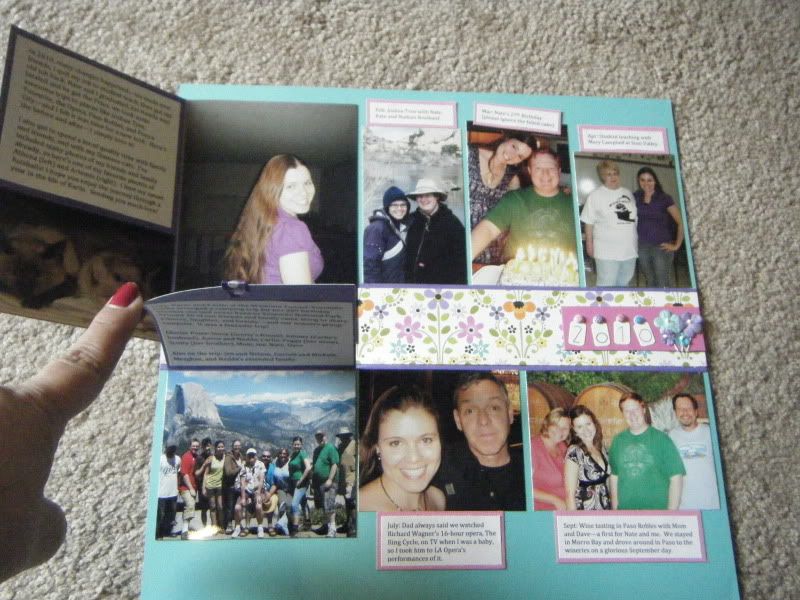
Here's the pages that my niece made that I promised to share with you.


2010 
This is my niece's layout for 2010. One of the big moments for her in 2010 was her sweet hubby graduating from college! Another biggie was when she trimmed her hair ... it was  l  o  n  g.
Look closely and you'll see tabs on a couple of photos. Karin adapted these to flip up/out to allow for longer journaling. When placing these in page protectors, I'll make a slit allowing these to be lifted.


2011
Karin had a very busy 2011. She used a photo or two from each month to highlight her year. The Beautiful Wings Embosslit was used to add some detail and the Large Oval Punch and the Scalloped Oval Punch were used as journaling spots.


Hope these gave you some ideas for your upcoming scrapbook projects. Don't wait, get your supplies out and make something ... today.


Tuesday, April 10, 2012

Tool Time Tuesday

I wanted to share some of my all time favorite tools for paper crafting. Whether it's card making, scrapbooking, or other paper crafts ... you can't own too many punches! My all time favorites are from Stampin' Up! In fact part of the reason I became a Stampin' Up! Demonstrator is due to my love of the punches they sell. I've bought many punches over the years, from many different companies. Stampin' Up! punches are by far the best on the market - in my opinion.


My sister works in the accounting field and at times has a verrrrrrrrry stressful job. We were talking about great music to help reduce stress and I thought I'd burn her a couple of CDs for the office. Now being a paper crafter, I couldn't just give her CDs with boring covers now could I? So I pulled out some scrap paper and punched and stuck my way to happiness! See - punches used for something other than making a card!

The CD covers with punched labels.

Here they are all put together with the cases resting with my punches. 

The black punches are the old style and the brownish gray ones are the new very cool style that locks down flat for wonderful storage!

Here's another much more traditional use for punches, labeling for scrapbooking. 
(That's my son. Isn't he handsome?! And he's smart too!)

We'll explore the uses of punches a great deal in various blog posts because they are so versatile and one tool that every crafter needs to have.

Punches used here are:


Now go out there and punch some stuff. LOL