Showing posts with label decorative label punch. Show all posts

Saturday, July 7, 2012

Simply Ashley


My granddaughter Ashley loves to pose for the camera. I love to take photos. It's a perfect match! I used my Stampin' Up! tools to work with many non-Stampin' Up! items. Love how I can mix and match my tools to my needs!


To make a page that looks like mine, you’ll need the following supplies. Remember, if you need any of these supplies, just click on the name of the item and it will take you directly to my shop.

Supplies:

animal print paper
Basic Black card stock
Top Note die
Beautiful Wings embosslit
sizzlit alpha die set
Big Shot
1" circle punch
3/4" circle punch
Decorative Label Punch
animal print rhinestones - or use Basic Jewels Rhinestones
alpha stickers
glue dots
snail adhesive

The strips:

Basic Black - 2 x 12
Animal print - 1 1/2 x 12
Basic Black -  1/2 x 12

Photos are sized 3x4


Are you getting inspiration from this blog?   One way you can help support it is to order your Stampin’ Up products through me.   Click HERE to place an order and have your order delivered directly to your door step from Stampin’ Up!

Take some time to get your pinky inky.



Thursday, May 31, 2012

Playing Catch Up

Hi Everyone! Hope your Memorial Day was great. We've been in and out of town so much this last month and had so many changes with things in the house ... well I just needed some time to clean and organize a bit. Still not done but moving in a positive direction.

So ... I've not posted for a few days. Ya I know ... you missed me. Don't worry, I gotcha covered! Here in one place are the posts for Tuesday and Wednesday. No more chit chat now. On with the important stuff.

Tip Tuesday -
Long ago in a far away land I learned to stamp and then learned to emboss. I learned to emboss over a toaster!  (Told ya it was long ago - didn't have heat guns back then!) Once heat guns were available for stamping instead of stripping paint & wall paper (did you know that's how they started out?) and I got my hands on one I learned a few tricks. Here's one today:


  • Grab a piece of cardboard, any cardboard: old cereal box, the cardboard from a pack of Designer Series Paper or the back of an old notebook. Doesn't matter. 
  • Make sure the piece of cardboard is at least 5" x7" in size.
  • Cover the cardboard with aluminium foil. Make sure the shiniest side is facing out. One side covered completely is all you need.
  • Get a clothes pin.
  • Now you have your own embossing "platform". The foil reflects the heat back on the paper and helps to heat the embossing powder faster. Also helps prevent that nasty buckle that can happen when embossing without a platform. The clothes pin holds the piece waiting to be embossed in place and helps to keep from getting your Inky Pinky too toasty. 
This is mine. Use it all the time.

Wednesday's post -

Now I know that I usually share scrapbooking pages on Saturday but I wanted to get this one sooner. See the background paper was made with a stamp that is being retired and I want you to be able to get it before it's gone. 


Supplies:

  • Stamp in random pattern on Whisper White card stock using Calypso Coral ink and the large splotch from the Extreme Elements stamp set. 
  • Trim a piece of Calypso Coral card stock to fit your photo and randomly stamp the splotch  from the Extreme Elements stamp set  using Calypso Coral ink. 
  • Adhere photo.
  • Using the Big Shot and Lucky Limeade card stock, cut a Top Note Die and trim off a small portion of the top. Adhere the cut edge under the photo.
  • With a scrap of Lucky Limeade card stock, punch a Decorative Label and cut in half.
  • Adhere to the top right corner of Calypso Coral card stock.
  • I stamped the year on top but you could do anything that works with your photo.
  • The Top Note Die is used for your journaling.

Remember, if you need any of these supplies, just click on the name of the item and it will take you directly to my shop. If you have any questions just leave me a comment or send me an email.


BTW, that's my adorable granddaughter. She was showing off her amazing bubble blowing skills. I love 8 year olds!

Enjoy!


Friday, May 11, 2012

Fast Card Friday

Mother's Day Card

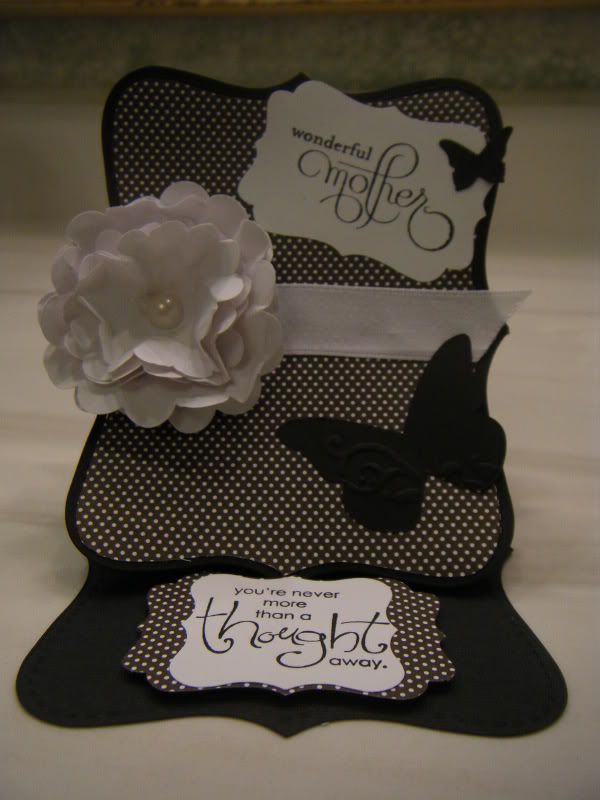
Mother's Day is this weekend. I hope you'll be spending it will people you love. Here's a little something that I whipped up. The longest part of making this card is making the flower. You could speed that up by using Paper Daisy Accents flowers from Stampin' Up!


Supplies:
White Ribbon
sentiment stamps
adhesives


This is a basic easel card in a Top Note Die shape. When you run the base of the card through the Big Shot using the Top Note Die you will need to:
  • Cut black paper 5 1/2 x 11
  • Fold @ 5 1/2
  • Place fold slightly below the top cutting edge of the die so that the fold will stay intact after cutting.
  • Cut another piece of black with the top note die - this is the front
  • Cut a piece of Berry Blossoms Designer Paper with the Top Note Die
  • Trim the designer paper around the edge, cutting along the "stitched" edge of the paper
  • From this point on build your card.


Take a moment to get out your supplies and make something special today. 


Saturday, May 5, 2012

Scrapbooking with Wisteria Wonder

This is the last post for Wisteria Wonder Week. Hope you had fun with it. Now ....

Just a few quick pages using


The layouts are pretty straight forward. The mats are cut to hold 4 x 6 photos in landscape. The base butterfly is only only attached on the right side while the butterflies on top are attached completely. A small pearl is placed on top.


 Here it is with actual photos on it!


Both of these papers are from the Berry Blossoms Designer Series Paper. It is retiring, along with all of our Designer Series Paper.Visit my store to order yours before they're gone for good.

This is my niece on her wedding day with her dashing hubby. Aren't they cute. 
The photos is 5 x 7. Matting is 1/4 larger on all sides. 
The little journaling spot is the Modern Label with the top trimmed and inked with Wisteria Wonder.


Be sure to check back next Saturday for more Scrapbooking ideas.


Friday, April 27, 2012

Simple & Quick

Fast Fun Friday

I looked at the calendar and freaked! April is almost over and that means that our Occasions Mini is almost over too. I don't know about you but I don't know where April has gone. So for the next few days I'm going to post some projects made with items that you can STILL get in our Occasions Mini via my Stampin' Up! store. Hurry - the month is almost over and the sale ends April 30th.

Now for the Fast & Fun part.

Stamps: 
Tools: 
Paper: 
  • Whisper White cut @ 4 X 5 1/4
  • Calypso Coral cut at 5 1/2 X 8 1/2, folded @ 4 1/4 to make a traditional sized card with the fold at the top. 
Accessories:

It took me longer to type this post than to make this card. LOL Obviously you can use whatever sentiment that works for you but wouldn't this be a nice card to receive when you're ill or going through a rough patch with a warm note inside. That's why I love stamping, I can create just what I need for any occasion with the recipient in mind. Personal and unique always makes the recipient feel special.
 
Stop by my shop and pick up supplies to make your own unique cards.

Have a great weekend and be sure to save some time to get out your supplies and create something.


Thursday, April 26, 2012

Birthdays on the Brain!

We have lots of Spring Birthdays in my family. Seems that as soon as March rolls around I spend most of my time stamping for birthdays or shopping for birthdays! So much fun!!!

I'm not the only one in the family that makes cards for birthdays. My sister out in CA does as well. Thought I'd share and brag on her a bit with the card that she made for my hubby's birthday last Sunday.


Isn't this darling?! The flames are made with the wing from Bird Punch and popped up on Stampin' Dimensionals. The tips of the flames are glittered to make them pop! The candles are strips of paper that have been run through embossing folders such as Perfect Polk-a-dots, Petals-a-Plenty, and  Vintage Wallpaper. Layer a piece of ribbon on top to hold the message stamped on a label punched from Decorative Label Punch.
Such a fun card to make and receive. It's also "green" because it's a great design to use up all those bits and pieces of paper left from other projects.


Don't forget - Retiring Products are listed in one easy place. 

Grab those supplies and make something today.


Tuesday, April 10, 2012

Tool Time Tuesday

I wanted to share some of my all time favorite tools for paper crafting. Whether it's card making, scrapbooking, or other paper crafts ... you can't own too many punches! My all time favorites are from Stampin' Up! In fact part of the reason I became a Stampin' Up! Demonstrator is due to my love of the punches they sell. I've bought many punches over the years, from many different companies. Stampin' Up! punches are by far the best on the market - in my opinion.


My sister works in the accounting field and at times has a verrrrrrrrry stressful job. We were talking about great music to help reduce stress and I thought I'd burn her a couple of CDs for the office. Now being a paper crafter, I couldn't just give her CDs with boring covers now could I? So I pulled out some scrap paper and punched and stuck my way to happiness! See - punches used for something other than making a card!

The CD covers with punched labels.

Here they are all put together with the cases resting with my punches. 

The black punches are the old style and the brownish gray ones are the new very cool style that locks down flat for wonderful storage!

Here's another much more traditional use for punches, labeling for scrapbooking. 
(That's my son. Isn't he handsome?! And he's smart too!)

We'll explore the uses of punches a great deal in various blog posts because they are so versatile and one tool that every crafter needs to have.

Punches used here are:


Now go out there and punch some stuff. LOL