Showing posts with label top note die. Show all posts

Saturday, June 23, 2012

Scrapbooking in Rich Razzleberry

Happy Saturday! I sure hope the temperatures where you live are more comfy than here. We're expected to reach into the triple digits this weekend. I have two things to say about that: 1) Please God, don't let us have a repeat of last summer's heat, and 2) I'm staying inside and playing with paper!

Today's scrapbook page came about in an interesting fashion. My daughter & I took her girls out for a photo shoot so we could have some up to date photos of the girls for Father's Day gifts. We went out in the heat & humidity of an Oklahoma summer afternoon and went to a park. While I was using my fancy-pants camera (thanks again sweet Hubby! I love it!), my daughter was using her phone and a cool app called Retro to shoot some photos.

Later while reviewing photos I decide I wanted to scrapbook a great number of them. However, the 4 that I wanted to use didn't all go together. See 1 had the cool retro edging around it and the other 3 were just normal. I didn't have any cool edging brushes for Photoshop and I didn't feel like spending $$$ on something I wasn't sure I'd use again. So I did what any modern scrapbook would do, I went to Google and looked for a free photo editing program on-line that had retro style edges! Found one too: piZap. You can upload your photos, edit and then download again to your computer - for FREE!!! Soooo cool!

After that long winded opening - here's today's page.


To make a page that looks like mine, you’ll need the following supplies. Remember, if you need any of these supplies, just click on the name of the item and it will take you directly to my shop.

Supplies:


The layout is fairly straight forward.
Photos are 3x3.
Frame was hand cut 8.5 x 8.5 outer frame size.
The frame is a 1/2 inch border on all sides.
Trim edge of Top Note die.
Top Note die was cut out of Whisper White and sponged using Old Olive first in the interior areas and Rich Razzleberry on the outer edges, making sure to ink the edge heavily.
Flowers were punched with the Blossom punch.
Flower edges were inked with coordinating ink.
Flower centers were punched out of Whisper White using the Boho Blossoms punch.
Flower centers were then inked the same as the Top Note die.
Insert brads.
Punch bird out of Rich Razzleberry.
Ink edges of bird in coordination ink.
Adhere assembled bird to inside of Old Olive flower with a dimensional.
Mount flowers with dimensionals.
Write journaling and mount Top Note die over the top of the frame on the right side.


Let's make it easier for our families to enjoy the wonderful photos that we all take. Get them off the computer, out of the boxes in the closet or off the photo card that's sitting in your camera. Make some fun scrapbook pages for your family. They'll love them.



Friday, June 22, 2012

A little something for the 4th

No Fast Card Friday today, instead I'm going to show you a little something for the 4th.


To make a card that looks like mine, you’ll need the following supplies. Remember, if you need any of these supplies, just click on the name of the item and it will take you directly to my shop.


Supplies needed:
Top Note Die
Perfect Polka-Dots embossing folder
Square Lattice embossing folder
Big Shot
Boho blossoms punch
Sticky Strip
Basic Jewels Rhinestones - I used some star shaped ones that I had on hand
Whisper White card stock
Real Red card stock
Night of Navy card stock
Snail Adhesive

I took a scrap of paper and ran it through the Big Shot and used the negative space to create a template so I'd know the placement for each piece.
Real Red & Whisper White were cut the size of the embossing folder and run through the Big Shot with the Perfect Polka-Dots folder.
Once both pieces were embossed, I cut the strips at just a touch over 1/2".
The Night of Navy piece was cut at approx. 2 1/2 x 2 1/2 and run through the Big Shot in the Square Lattice embossing folder.
Using scrap Whisper White, I cut a couple of plane strips and put Snail Adhesive on one side. On to this I placed my Real Red & Whisper White strips, alternating colors. 
I used my negative of the Top Note Die to see where to place the Night of Navy piece to my liking.
Using a ton of Snail I adhered that in place.
I placed the whole thing carefully on the Top Note Die and ran it through the Big Shot. (the strips of scrap Whisper White on the back held it all in place.
Then, using Sticky Strip on the back in areas that were not secured with the scrap strips, I adhered the piece to a standard card.
Punching out 5 of the smallest flowers on the Boho Blossom punch, I adhered those to in the Night of Navy section and then added my rhinestones.

This was may look a little intimidating, but it really isn't. Take your time and read the directions carefully and it's pretty easy.

Take some time to make something today.


Thursday, May 31, 2012

Playing Catch Up

Hi Everyone! Hope your Memorial Day was great. We've been in and out of town so much this last month and had so many changes with things in the house ... well I just needed some time to clean and organize a bit. Still not done but moving in a positive direction.

So ... I've not posted for a few days. Ya I know ... you missed me. Don't worry, I gotcha covered! Here in one place are the posts for Tuesday and Wednesday. No more chit chat now. On with the important stuff.

Tip Tuesday -
Long ago in a far away land I learned to stamp and then learned to emboss. I learned to emboss over a toaster!  (Told ya it was long ago - didn't have heat guns back then!) Once heat guns were available for stamping instead of stripping paint & wall paper (did you know that's how they started out?) and I got my hands on one I learned a few tricks. Here's one today:


  • Grab a piece of cardboard, any cardboard: old cereal box, the cardboard from a pack of Designer Series Paper or the back of an old notebook. Doesn't matter. 
  • Make sure the piece of cardboard is at least 5" x7" in size.
  • Cover the cardboard with aluminium foil. Make sure the shiniest side is facing out. One side covered completely is all you need.
  • Get a clothes pin.
  • Now you have your own embossing "platform". The foil reflects the heat back on the paper and helps to heat the embossing powder faster. Also helps prevent that nasty buckle that can happen when embossing without a platform. The clothes pin holds the piece waiting to be embossed in place and helps to keep from getting your Inky Pinky too toasty. 
This is mine. Use it all the time.

Wednesday's post -

Now I know that I usually share scrapbooking pages on Saturday but I wanted to get this one sooner. See the background paper was made with a stamp that is being retired and I want you to be able to get it before it's gone. 


Supplies:

  • Stamp in random pattern on Whisper White card stock using Calypso Coral ink and the large splotch from the Extreme Elements stamp set. 
  • Trim a piece of Calypso Coral card stock to fit your photo and randomly stamp the splotch  from the Extreme Elements stamp set  using Calypso Coral ink. 
  • Adhere photo.
  • Using the Big Shot and Lucky Limeade card stock, cut a Top Note Die and trim off a small portion of the top. Adhere the cut edge under the photo.
  • With a scrap of Lucky Limeade card stock, punch a Decorative Label and cut in half.
  • Adhere to the top right corner of Calypso Coral card stock.
  • I stamped the year on top but you could do anything that works with your photo.
  • The Top Note Die is used for your journaling.

Remember, if you need any of these supplies, just click on the name of the item and it will take you directly to my shop. If you have any questions just leave me a comment or send me an email.


BTW, that's my adorable granddaughter. She was showing off her amazing bubble blowing skills. I love 8 year olds!

Enjoy!


Monday, May 14, 2012

Medallion Card

Happy Monday!

Hope you all enjoyed Mother's Day with people that make you happy. I was blessed enough to spend time with my daughter & her family. My Son-in-Law scored big points by taking both myself and my daughter out for mani/pedis. OMG that was wonderful! My wonderful hubby made his BBQ chicken for us (one word - OUTSTANDING!) and we all got to visit with my military son via Skype. If that wasn't enough, all the family here at home went out to see "The Avengers" - awesome. It was a special day that had  sweet tender moments I won't soon forget. I hope you had the same kind of day.

We're still focusing on stamps that are retiring. One stamp that makes a statement when used is the Medallion Stamp. I'll be showing a couple of different ways to use this one, so stay tuned.

Today's card:

Supplies:
Medallion Stamp
Create a Cupcake - clear mount stamp set
Top Note Die
Big Shot
Modern Label punch
Word Window punch
Calypso Coral ink
Calypso Coral card stock
Whisper White card stock
Basic Black card stock
Basic Pearls Jewels


  • Cut Calypso Coral card stock along the 11" edge @ 5 1/2".
  • Score @ 4 1/4.
  • Stamp Medallion in Calypso Coral ink in random patter, being sure to stamp off the edge of the card base to add interest.
  • Using Top Note die and Whisper White card stock, run through Big Shot to create white top layer. Do Not toss out leftover scrap.
  • Take white Top Note sheet and stamp Medallion in Calypso Coral again, going off the edge of the paper.
  • Use Basic Black card stock to create another Top Note piece.
  • Cut the Basic Black Top Note down the center horizontally.
  • Using adhesive, adhere the Basic Black Top Note piece to the back of the Whisper White Top Note piece, being sure to adjust edges according to the photo. *Note: you may need to do some extra trimming of the Basic Black Top Note at the horizontal points.*
  • Adhere to card.
  • Using scrap of Whisper White stamp Happy Birthday from the Create a Cupcake stamp set in Calypso Coral ink.
  • Punch out sentiment with Word Window punch.
  • Using the Modern Label punch, punch out 1 from  Basic Black card stock and  1 from Calypso Coral card stock.
  • Split the Basic Black Modern Label horizontally, just as done above with the Basic Black Top Note piece.
  • Adhere to the Calypso Coral piece.
  • Adhere the sentiment on top.
  • Adhere to card and place a pearl on the edge, according to the photo.


This style of card works for many occasions just be sure that the sentiment you choose will fit inside the Word Window punch or the Modern Label punch.

If this is a card that you think you would be able to use, leave me a comment below.

Take some time for yourself today -  grab your supplies and make something.


Friday, May 11, 2012

Fast Card Friday

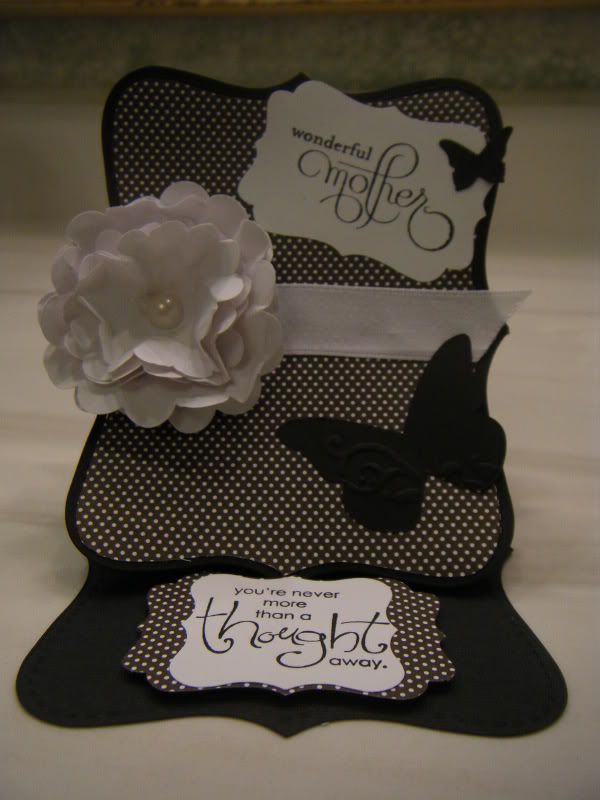
Mother's Day Card

Mother's Day is this weekend. I hope you'll be spending it will people you love. Here's a little something that I whipped up. The longest part of making this card is making the flower. You could speed that up by using Paper Daisy Accents flowers from Stampin' Up!


Supplies:
White Ribbon
sentiment stamps
adhesives


This is a basic easel card in a Top Note Die shape. When you run the base of the card through the Big Shot using the Top Note Die you will need to:
  • Cut black paper 5 1/2 x 11
  • Fold @ 5 1/2
  • Place fold slightly below the top cutting edge of the die so that the fold will stay intact after cutting.
  • Cut another piece of black with the top note die - this is the front
  • Cut a piece of Berry Blossoms Designer Paper with the Top Note Die
  • Trim the designer paper around the edge, cutting along the "stitched" edge of the paper
  • From this point on build your card.


Take a moment to get out your supplies and make something special today. 


Monday, April 23, 2012

Happy Monday!

Yesterday was a big day in the Inky Pinky household -  the hubby's birthday. Now you need to understand something, I LOVE birthdays. No, seriously I LOVE birthdays. Doesn't matter who is having the birthday or how old they are I just love celebrating the fact that they are here and we've been blessed with another year to enjoy and love them.

So, back to the hubby. We kept his birthday kinda low-key since we've had sooooo much going on. The family was here to celebrate with a cookout. Our son grilled steaks (YUM!), our son-in-law shucked corn for me (I hate that job!), our daughter was busy fixing the veggie tray, our granddaughters were setting the table, I was fixing baked potatoes and other goodies, and the hubby got to just sit and watch all the fuss for a change! Lots of fun and laughter was the main ingredient!

The stamping portion of this post is the birthday card I made for him.  The image is from  "In Wilderness" and the background stamp is called  "Wonderfully Worn" .  Both the In the Wilderness set and the Wonderfully Worn stamp are to be retired as of June 1st. If you like them, don't wait. They won't be around much longer.


Big Shot Dies: Top Note die
Embossing folder: cuttlebug
Misc. items: Embroidery floss, button, Sticky Strip, Snail Adhesive, Mini glue dots

Using Natural Ivory paper, run through Big Shot with the Top Note die. Ink Wonderfully Worn stamp with Crumb Cake ink and stamp on Top Note. Stamp buffalo image with Stazon Ink on Top Note. Using Early Espresso Ink and Crumb Cake Ink, watercolor buffalo. Use Old Olive to watercolor grass. Trim Top Note just below stamped image. Using Chocolate Chip paper, run through Big Shot with embossing folder that has been inked with Early Espresso. This will ink the recessed areas. Tear & ink edges of embossed piece with Early Espresso. Mount Top Note on Chocolate Chip piece. Take a piece of Crumb Cake paper that is cut at 5 1/2 x 8 1/2, scored and folded at  4 1/4, ink the Wonderfully Worn stamp with Early Espresso and stamp on Crumb Cake card. Mount Chocolate Chip piece on top using Sticky Strip. Take a strip of Old Olive approx. 1/2 x 5 inches and using the Mat Pack & Paper Piercing tool, pierce paper create holes for cross stitching. Use embroidery floss to stitch. Add button with a glue dot. Adhere Old Olive strip across trimmed edge of  Top Note with Sticky Strip.

If you have any questions just give me shout @ jm1inkypinky@gmail.com

Want to view which stamps are retiring: Retiring Stamps

Have a wonderful day and get out those stamps and make something!


Friday, April 6, 2012

Fun Friday!

I haven't fallen off the face of the earth, I've just been busy getting ready to visit family in CA. Getting excited about my trip. I love the drive from OK to CA, the open range, the vistas and the mountains that I miss. Not to mention the desert, man I miss dry heat!

Today I've got a little card inspired by a card that I saw on Pinterest (yes, again with the Pinterest). I've changed it up a bit. I'm LOVING the color Pacific Point that Stampin' Up! offers. It's such a deep rich color. It's hard not to reach for Pacific Point or Melon Mambo every time I make something.

This is the best shot I could get with the lighting at night. It's the closest I could get to the true shade of the paper.  I used Pacific Point paper for the basic of the card and for the butterflies. The butterflies are cut from the  Beautiful Wings Stampin' Up! Embosslit die. The white gel pen was used to define the stitching on the Top Note die, which was cut in black. The "thank you" is from the "For All You Do" stamp set. Thank you was stamped in Versamark ink and then embossed in white. Each of the butterflies are accented with some tiny pearls. 

Beautiful Wings Embosslit Die
Top Note Die
For All You Do stamp set (wood mount)
Pacific Point card stock
Basic Black cardstock
White gel pen
Basic Pearls
Versamark Ink
White embossing powder

Have a blessed Good Friday.

Friday, March 30, 2012

First Class

I held my first class on Tuesday, March 27th. I think the ladies had fun, I know I did. We made 3 projects as an intro into stamping and punch art. What fun to see the projects come to life before our eyes!

First off is a 3 x 3 note card.

We played with a roller stamp to decorate our "bag-a-lope", and tried out the Big Shot by cutting a Top Note die shape for the topper for our bag.


They make a nice little set, don't you think?


Oh but we weren't done yet! With Easter so close we HAD for make some kind of bunny thing ... so we did! The ladies made little Easter Baskets with a bunny face on the front and a cotton tail on the back. Such FUN!


If you missed joining us this time, don't worry - there's another class coming up April 20, 7 -10 pm. Classes are $15 or free with a $15 order. We'll be making cards that are suitable for Mother's Day or a woman's birthday or just a thinking of you friendship card. We'll learn some new techniques too.  Be sure to call (580-762-2904) or email (jm1inkypinky@gmail.com) to RSVP. We're saving a spot for you!